7. Writing SQL Queries
The most common kind of inner tab is the Query Tab, containing the following elements:
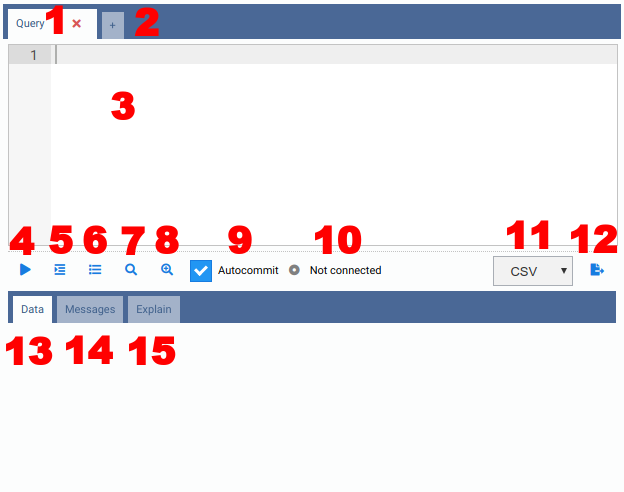
- 1) Tab Header: You can see the name of the tab and an icon to close it. If there is a query running in the tab, you will see an indicator. If the tab finishes running and you are working on a different tab, a green indicator you be shown. By double-clicking on the tab name, you will be able to rename the tab.
- 2) Add Tab: You can quickly add another inner tab by clicking on the plus icon.
- 3) SQL Editor: Full-featured SQL editor with SQL syntax highlighting,
Find & Replace (
Ctrl-FandCtrl-H) and an autocomplete component, explained below. - 4) Execute: The text contained in the SQL Editor will be executed against
the current active database when you click on this button (or hit the shortcut
,
Alt-Qby default). If there is some selected text in the SQL Editor, it will execute only the selected text. Once the command is running, a red Cancel button will be shown, allowing you to cancel the execution (or using the shortcut,Alt-Cby default). - 5) Indent SQL: This button will prettify any SQL code written in the SQL
editor (shortcut
Alt-Dby default). - 6) Query History: All commands executed against the current database are stored in the Query History, which can be accessed by clicking on this button. You also will be able to filter by date and text to find a SQL command you need.
- 7) Explain (PostgreSQL only): Call your SQL query against PostgreSQL by
putting
EXPLAINin front of it. The results will be shown in a textual and graphical form in the Explain tab (please see Chapter 8 for more details). - 8) Explain Analyze (PostgreSQL only): Same as Explain button, but call
the SQL query with
EXPLAIN ANALYZE, which will effectively execute the query. - 9) Autocommit (PostgreSQL only): When enabled, every query executed will be commited to the database. When disabled, OmniDB starts a transaction and upon execution of a query, the interface will show buttons allowing the user to Commit or Rollback. The user can also keep the transaction open and execute other commands.
- 10) Backend Status (PostgreSQL only): When you open a new Query Tab, the status is “Not Connected”, because OmniDB didn’t start a PostgreSQL backend yet. When you execute the first query, OmniDB starts a new backend and keep it linked to the Query Tab (each Query Tab will be assigned its own backend). The status of the backend (idle, active, idle in transaction, etc) will be shown in this field. When you close the Query Tab, OmniDB terminates the backend.
- 11) Export File Type: Can be either CSV or XLSX.
- 12) Export To File: By clicking on this button, OmniDB executes the current query and saves it to a file in OmniDB’s temp folder. After the file is saved, the interface allows the user to download it.
- 13) Data Results: If the query is a
SELECT, then it will show a grid with the results. If the query is a DML or DDL, it will show the message returned by the RDBMS. - 14) Messages (PostgreSQL only): Any messages (such as the ones given by
the command
RAISE NOTICE) will be shown here. - 15) Explain View (PostgreSQL only): Shows a full-featured component to view the PostgreSQL execution plan in textual or graphical form.
Once executed, the tabs are also saved in OmniDB user database (title and
contents), so the next time you open OmniDB, you will see them all open. Also,
every command you execute in a Query Tab is saved to your Query History and to
the omnidb.log file too.
SQL Autocomplete
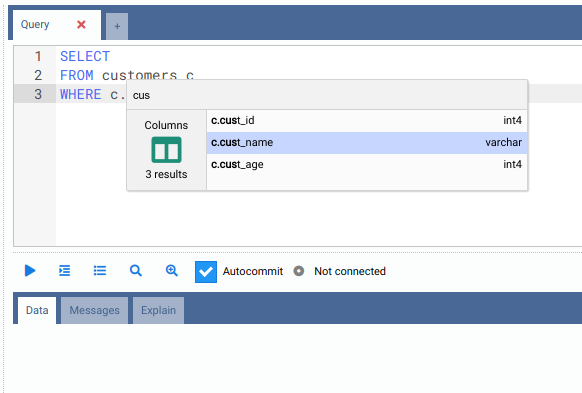
The SQL editor has a feature that helps a lot when creating new queries: SQL
code completion. With this feature it is possible to autocomplete columns
contained in a table referenced by an alias. To open the autocomplete interface
you just have to type the alias, the character . and then hit Ctrl-Space:
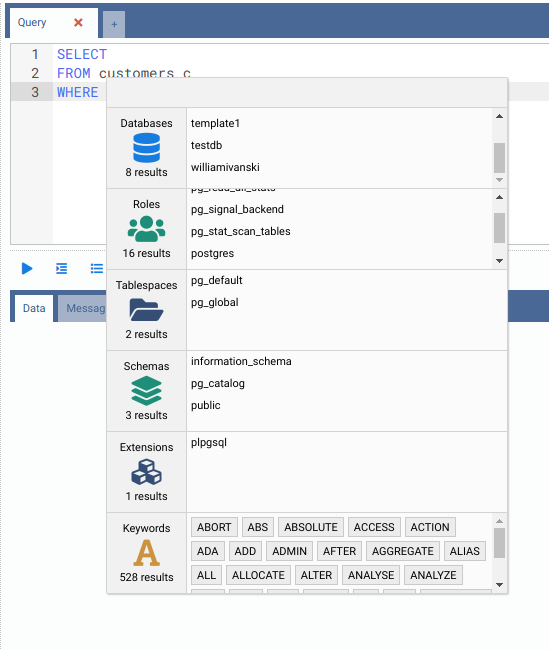
If the user does not start the autocomplete with the cursor close to a table alias, the component will show multiple categories of data. By typing in the filter textbox, elements in all categories will be filtered:
The autocomplete component is also able to identify some contextual information.
For example, if you type a name of a schema, then type the character ., then
hit Ctrl-Space, you will be able to filter among objects contained only in
that schema:

Please note that for RDBMS other than PostgreSQL, the autocomplete component only works for table columns.